|
Process
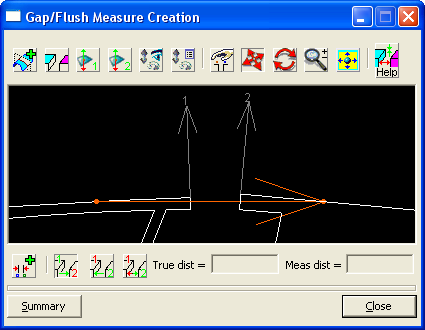
Create a Gap/Flush Measurement
![]() Click on Modeling
Click on Modeling ![]()
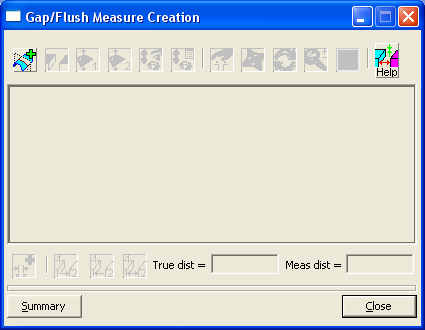
![]() Gap Flush Measure, or go to Create Gap/Flush Measurement icon
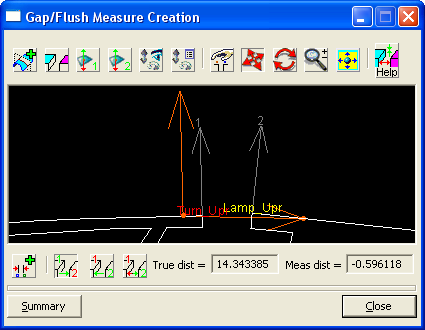
Gap Flush Measure, or go to Create Gap/Flush Measurement icon ![]() in the Spec Study toolbar, to open the Gap/Flush Measure Creation dialog box.
in the Spec Study toolbar, to open the Gap/Flush Measure Creation dialog box.
![]() Click on
Click on ![]() Create Section button. This will open the Pick...position on...feature dialog that prompts the user to select the two surfaces for the measurement.
Create Section button. This will open the Pick...position on...feature dialog that prompts the user to select the two surfaces for the measurement.
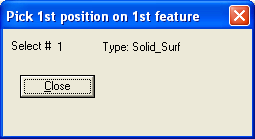
![]() Select the two surfaces. The Gap/Flush Measure Creation dialog reopens showing the 2D created section. The section is also shown in the Graph window.
Select the two surfaces. The Gap/Flush Measure Creation dialog reopens showing the 2D created section. The section is also shown in the Graph window.
Note: The user can turn on/off the section plane from View ![]() Cross Section
Cross Section ![]()
![]() Show Cross Section Plane.
Show Cross Section Plane.
![]() If necessary, use the
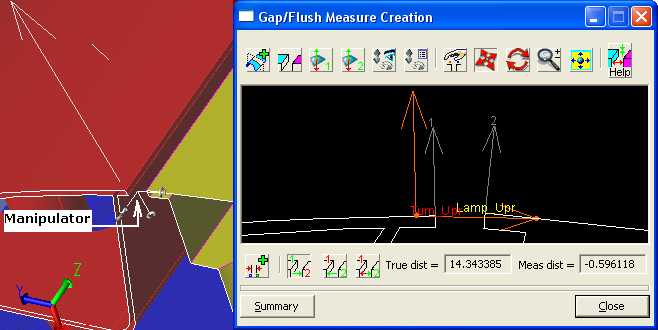
If necessary, use the ![]() Drag Measurement Points button to adjust the measurement by repositioning the two measurement points. The points can be dragged along the section line, on the surface on which they were created in the Graph window. There are two orange arrows: one shows the measurement direction (along the first point's vector direction, as default), and the other one points from the first picked point to the second picked point (marked with orange dots). The grey arrows show the individual direction for each measurement point.
Drag Measurement Points button to adjust the measurement by repositioning the two measurement points. The points can be dragged along the section line, on the surface on which they were created in the Graph window. There are two orange arrows: one shows the measurement direction (along the first point's vector direction, as default), and the other one points from the first picked point to the second picked point (marked with orange dots). The grey arrows show the individual direction for each measurement point.
![]() Click the
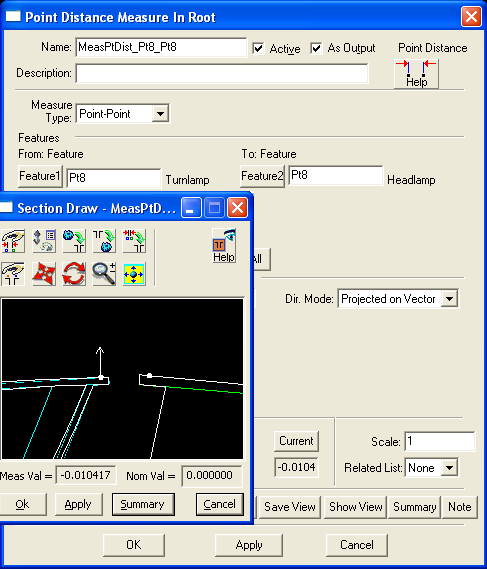
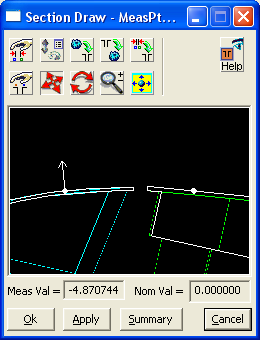
Click the ![]() Create Measure button to create the actual measurement. This will open the Section Draw dialog, which displays the section, measurement points, nominal value, and measurement direction.
Create Measure button to create the actual measurement. This will open the Section Draw dialog, which displays the section, measurement points, nominal value, and measurement direction.
•Gap/Flush Measure Creation dialog options:
![]()
![]() Create Section will create a new section.
Create Section will create a new section.
![]()
![]() Re-Select Features in Graph Window allows the user to select other measurement surfaces (reselect the two features), by clicking them in the Graph window.
Re-Select Features in Graph Window allows the user to select other measurement surfaces (reselect the two features), by clicking them in the Graph window.
![]()
![]() Reverse Feature 1 Direction will reverse the direction of the first surface vector.
Reverse Feature 1 Direction will reverse the direction of the first surface vector.
![]()
![]() Reverse Feature 2 Direction will reverse the direction of the second surface vector.
Reverse Feature 2 Direction will reverse the direction of the second surface vector.
![]()
![]() Hide/Show Manipulator will hide or display the section manipulator, which allows the user to drag and reposition the section along one axis, and rotate it around the other two axes.
Hide/Show Manipulator will hide or display the section manipulator, which allows the user to drag and reposition the section along one axis, and rotate it around the other two axes.
![]()
![]() Options button (in the Gap/Flush Measure Creation dialog) will open the Edit Parameters dialog (see below).
Options button (in the Gap/Flush Measure Creation dialog) will open the Edit Parameters dialog (see below).
![]()
![]() Drag Measurement Points repositions the two measurement points.
Drag Measurement Points repositions the two measurement points.
![]()
![]() Pan,
Pan, ![]() Rotate, and
Rotate, and ![]() Zoom allow the user to reposition, orient, and increase/decrease the image, shown in the Gap/Flush Measure Creation window.
Zoom allow the user to reposition, orient, and increase/decrease the image, shown in the Gap/Flush Measure Creation window.
![]()
![]() Autoscale will zoom in or zoom out to best fit the section into the window.
Autoscale will zoom in or zoom out to best fit the section into the window.
![]()
![]() Help button is context sensitive; it will open the Help Manual at required topic page.
Help button is context sensitive; it will open the Help Manual at required topic page.
![]()
![]() Create Measure will create the actual measurement.
Create Measure will create the actual measurement.
![]() Dir Option
Dir Option
![]()
![]() 1st Point Direction (default): the measurement is taken along the first point vector direction.
1st Point Direction (default): the measurement is taken along the first point vector direction.
![]()
![]() 2nd Point Direction: the measurement is taken along the second point vector direction.
2nd Point Direction: the measurement is taken along the second point vector direction.
![]()
![]() Point to Point Direction: the vector direction will be created between the two measurement points. This setting will measure the true distance between the points.
Point to Point Direction: the vector direction will be created between the two measurement points. This setting will measure the true distance between the points.
![]() True dist = displays the value of the true distance between the two measurement points.
True dist = displays the value of the true distance between the two measurement points.
![]() Meas dist = displays the value of the distance between the two measurement points, measured along the vector direction.
Meas dist = displays the value of the distance between the two measurement points, measured along the vector direction.
![]() Summary will open a dcs_spec_sum.tmp file (using Notepad), and list all parameters for the Gap/Flush Measure Creation dialog. Select File/Save As to save the data in text format.
Summary will open a dcs_spec_sum.tmp file (using Notepad), and list all parameters for the Gap/Flush Measure Creation dialog. Select File/Save As to save the data in text format.
![]() Close will close the Gap/Flush Measure Creation dialog.
Close will close the Gap/Flush Measure Creation dialog.
•Edit Parameters dialog (from Gap/Flush Measure Creation dialog ![]() Options button)
Options button)
Here the user can type in new coordinates and manipulate the direction for the section plane. The direction can be set along one of the axes, or along a vector chosen by the user (by editing the I, J, K values).
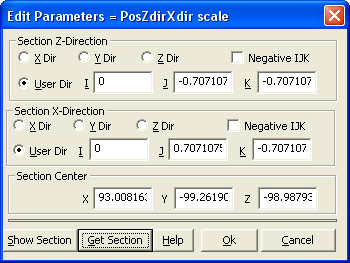
![]() Section Z-Direction
Section Z-Direction
![]() X Dir, Y Dir, Z Dir: Will set the section's Z-axis square to grid, along X, Y, or Z major directions.
X Dir, Y Dir, Z Dir: Will set the section's Z-axis square to grid, along X, Y, or Z major directions.
![]() Negative IJK: Will reverse the vector direction for the section's Z-axis.
Negative IJK: Will reverse the vector direction for the section's Z-axis.
![]() User Dir: Allows the user to type-in the I, J, K components for the Z-axis.
User Dir: Allows the user to type-in the I, J, K components for the Z-axis.
![]() Section X-Direction
Section X-Direction
![]() X Dir, Y Dir, Z Dir: Will set the section's X-axis square to grid, along X, Y, or Z major directions.
X Dir, Y Dir, Z Dir: Will set the section's X-axis square to grid, along X, Y, or Z major directions.
![]() Negative IJK: Will reverse the vector direction for the section's X-axis.
Negative IJK: Will reverse the vector direction for the section's X-axis.
![]() User Dir: Allows the user to type-in the I, J, K components for the X-axis.
User Dir: Allows the user to type-in the I, J, K components for the X-axis.
![]() Section Center: Displays the x, y, and z coordinates for the section plane.
Section Center: Displays the x, y, and z coordinates for the section plane.
![]() Show Section: Will update the section in the Graph window, based on the changes made for the section's X and Z axes, and Center.
Show Section: Will update the section in the Graph window, based on the changes made for the section's X and Z axes, and Center.
![]() Get Section: Will update the section's X and Z axes, and Center in the Edit Parameters dialog, based on the changes made on the section in the Graph window, using the Manipulator.
Get Section: Will update the section's X and Z axes, and Center in the Edit Parameters dialog, based on the changes made on the section in the Graph window, using the Manipulator.
![]() Help: The Help button will open the Help Manual at the specific topic page.
Help: The Help button will open the Help Manual at the specific topic page.
![]() Ok: Will apply changes to the section in Gap/Flush Measure Creation dialog.
Ok: Will apply changes to the section in Gap/Flush Measure Creation dialog.
![]() Cancel: Will ignore all changes and exit the Edit Parameters dialog.
Cancel: Will ignore all changes and exit the Edit Parameters dialog.
•Section Draw dialog (from ![]() Create Measure button)
Create Measure button)
![]()
![]() Open Measurement Dialog button will open the newly created measurement dialog box.
Open Measurement Dialog button will open the newly created measurement dialog box.
![]()
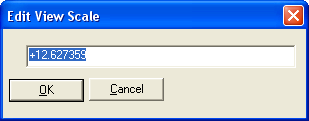
![]() Options button (in the Section Draw dialog) allows the user to increase or decrease the section size, based on the scale factor used.
Options button (in the Section Draw dialog) allows the user to increase or decrease the section size, based on the scale factor used.
![]()
![]() Read 3D Section from Graph Window will read the section information from the main Graph window and display it in the Section Draw window. This option can be used when the user wants to associate a section to an existing measurement.
Read 3D Section from Graph Window will read the section information from the main Graph window and display it in the Section Draw window. This option can be used when the user wants to associate a section to an existing measurement.
![]()
![]() Show 3D Section will update the section orientation in the Graph window, based on the information shown in the Section Draw window.
Show 3D Section will update the section orientation in the Graph window, based on the information shown in the Section Draw window.
![]()
![]() Force 3D Section on Points will position the section through the existing measurement points.
Force 3D Section on Points will position the section through the existing measurement points.
![]()
![]() Drag Measurement Points allows the user to slide the measurement points along the surface to increase/decrease the nominal value of the measurement.
Drag Measurement Points allows the user to slide the measurement points along the surface to increase/decrease the nominal value of the measurement.
Note: Dragging is prevented for:
(1) non-feature point;
(2) a pt at it's deviated position;
(3) a surface center feature point.
![]()
![]() Pan,
Pan, ![]() Rotate, and
Rotate, and ![]() Zoom allow the user to reposition, orient, and increase/decrease the image, shown in the Section Draw window.
Zoom allow the user to reposition, orient, and increase/decrease the image, shown in the Section Draw window.
![]()
![]() Autoscale will zoom in or zoom out to fit the measurement points into the Section Draw window.
Autoscale will zoom in or zoom out to fit the measurement points into the Section Draw window.
![]()
![]() Help will open the Help Manual.
Help will open the Help Manual.
![]() Meas Value displays the value of the measurement (same as Meas distance from Gap/Flush Measure Creation dialog).
Meas Value displays the value of the measurement (same as Meas distance from Gap/Flush Measure Creation dialog).
![]() Nom Value displays the measurement value in the last nominal build position.
Nom Value displays the measurement value in the last nominal build position.
![]() Ok will save the last settings made in the Section Draw dialog.
Ok will save the last settings made in the Section Draw dialog.
![]() Apply
Apply
![]() Summary will open a dcs_temporary.txt file (using Notepad), and list all parameters for the newly created measurement. Select File/Save As to save the data in text format.
Summary will open a dcs_temporary.txt file (using Notepad), and list all parameters for the newly created measurement. Select File/Save As to save the data in text format.
![]() Cancel button will close the Section Draw dialog, without applying any changes.
Cancel button will close the Section Draw dialog, without applying any changes.
B.) Open an existing section
![]() Go to the Navigation window and RH-click a single measurement and select
Go to the Navigation window and RH-click a single measurement and select ![]() Show Section option. This will open the Section Draw dialog for the selected measurement. To show all sections for a part or assembly, RH-click on the part's measurement group and select
Show Section option. This will open the Section Draw dialog for the selected measurement. To show all sections for a part or assembly, RH-click on the part's measurement group and select ![]() Show All Meas Sections. This will open one Section Draw dialog for each measurement in the list.
Show All Meas Sections. This will open one Section Draw dialog for each measurement in the list.
Note: Use the ![]() Deviate button to view the parts deviating in the Section Draw windows.
Deviate button to view the parts deviating in the Section Draw windows.
C.) Add sectioning information to an existing measurement
![]() Open the measurement dialog for which a section is going to be created, and locate the measurement points in the Graph window.
Open the measurement dialog for which a section is going to be created, and locate the measurement points in the Graph window.
![]() Create a section using the
Create a section using the ![]() Gap/Flush Measure Creation dialog. It is recommended to create the section close to the points included in the existing measurement.
Gap/Flush Measure Creation dialog. It is recommended to create the section close to the points included in the existing measurement.
![]() In the Section Draw dialog (opened from the Measurement dialog using ShowSectionDraw button), click
In the Section Draw dialog (opened from the Measurement dialog using ShowSectionDraw button), click ![]() Read 3D Section from Graph Window. This will read the information from the current section displayed in the graph window. This information will be saved for the selected measurement.
Read 3D Section from Graph Window. This will read the information from the current section displayed in the graph window. This information will be saved for the selected measurement.
![]() Click
Click ![]() Force 3D Section on Points to position the section through the existing measurement points. This new created section is passing through existing measurement points, and will be saved for the selected measurement. The Meas Value in the Section Draw window is the same with the Current value in the Measure dialog.
Force 3D Section on Points to position the section through the existing measurement points. This new created section is passing through existing measurement points, and will be saved for the selected measurement. The Meas Value in the Section Draw window is the same with the Current value in the Measure dialog.