3DCS Styles are used to add realistic texture/surface finishes to parts, or sub assemblies of parts, and assemblies. General image file can be applied to unique textures, and color settings can then be applied to these textures in the Style Editor. The individual styles created within the 3DCS Style Editor are then used to generate unique Style Sets within a model.
|
Navigation Window Style Options
Use the right hand mouse button on Styles, StyleSets, or individual Styles (Style1, Style12, etc) to open the submenus shown below.
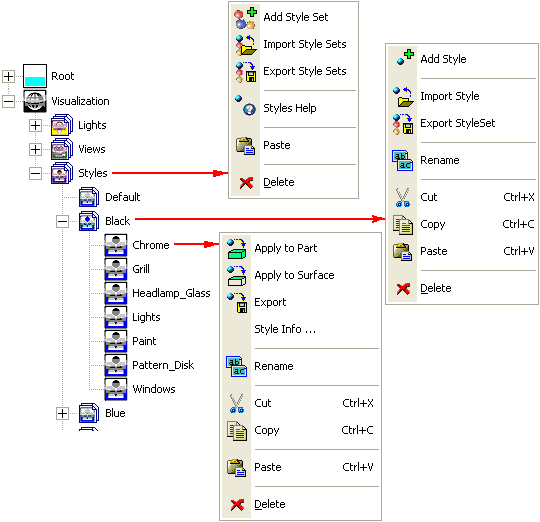
The DCS Navigation Tree allows the easy navigation of Styles:
•Styles (parent)
![]()
![]() Add Style Set: Creates a new Style Set.
Add Style Set: Creates a new Style Set.
![]()
![]() Import Style Sets: Loads saved Style Sets. Style Sets can be imported from one 3DCS model to another.
Import Style Sets: Loads saved Style Sets. Style Sets can be imported from one 3DCS model to another.
![]()
![]() Export Style Sets: Saves existing Style Sets. Style Sets can be exported to another 3DCS model.
Export Style Sets: Saves existing Style Sets. Style Sets can be exported to another 3DCS model.
![]()
![]() Styles Help: Opens the Help Manual at the Styles page.
Styles Help: Opens the Help Manual at the Styles page.
![]()
![]() Paste: Applies the copied Style Set.
Paste: Applies the copied Style Set.
![]()
![]() Delete: Removes all Styles and Style Sets.
Delete: Removes all Styles and Style Sets.
•Styles Set
![]()
![]() Add Style: Creates a new Style.
Add Style: Creates a new Style.
![]()
![]() Import Style: Loads a saved Style. Styles can be imported from one 3DCS model to another.
Import Style: Loads a saved Style. Styles can be imported from one 3DCS model to another.
![]()
![]() Export Style Set: Saves selected Style Set. Style Sets can be exported to another 3DCS model.
Export Style Set: Saves selected Style Set. Style Sets can be exported to another 3DCS model.
![]()
![]() Rename: Renames the selected Style Set.
Rename: Renames the selected Style Set.
![]()
![]() Cut: Removes a Style Set (and places it on the Clipboard).
Cut: Removes a Style Set (and places it on the Clipboard).
![]()
![]() Copy: Stores a duplicate of a Style Set.
Copy: Stores a duplicate of a Style Set.
![]()
![]() Paste: Applies (inserts) the cut/copied Style Set.
Paste: Applies (inserts) the cut/copied Style Set.
![]()
![]() Delete: Removes a Style Set.
Delete: Removes a Style Set.
•Style (individual)
![]()
![]() Apply to Part: The selected Style is applied to the part.
Apply to Part: The selected Style is applied to the part.
![]()
![]() Apply to Surface: The selected Style is applied to individual surface.
Apply to Surface: The selected Style is applied to individual surface.
![]()
![]() Export: Saves a created Style. Styles can be exported to another 3DCS model.
Export: Saves a created Style. Styles can be exported to another 3DCS model.
![]() Style Info: Will open the Style Info Dialog, which displays information for the style name, location, and parts that is applied to.
Style Info: Will open the Style Info Dialog, which displays information for the style name, location, and parts that is applied to.
![]()
![]() Rename: Renames the selected Style.
Rename: Renames the selected Style.
![]()
![]() Cut: Removes a Style (and places it on the Clipboard).
Cut: Removes a Style (and places it on the Clipboard).
![]()
![]() Copy: Stores a copy of the Style.
Copy: Stores a copy of the Style.
![]()
![]() Paste: Applies (inserts) the copied Style.
Paste: Applies (inserts) the copied Style.
![]()
![]() Delete: Removes a Style.
Delete: Removes a Style.
Note: The Styles and Style Sets can be rearranged using drag and drop options in the Navigation window.
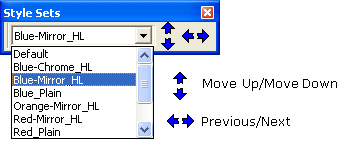
Notes:
• The Style Sets can be rearranged using Up and Down arrows options in the Style Sets toolbar.
• The Style Sets toolbar now expands to show full name for long names, when the toolbar is resized.
Process
1.Load desired .hsf files.
2.Expand the visualization tab in the navigation window.
3.Right click on Styles and Click "Add Style Set".
4.Right click on the new style set and Click "Add Style".
5.Double click on the new Style to open the Material editor.
6.Material Editor
7.Load various images to be used to create textures.
8.Adjust the texture settings and observer their effect in the Style Section image.
9.Apply the newly created textures to the Style Settings and observer their effects in the Style Section image.
10.Close the Material editor when Styles are set as desired.
11.Right-click Style and click "Apply to Part" and choose the part to which the style is to be applied to.
12.Repeat until entire model appears as desired.
13.Note: All style sets are automatically saved with the model in a file named ModelName.dcs_gfx (the Save GFX (Visual) File option must be checked on in the DCS Preferences dialog).
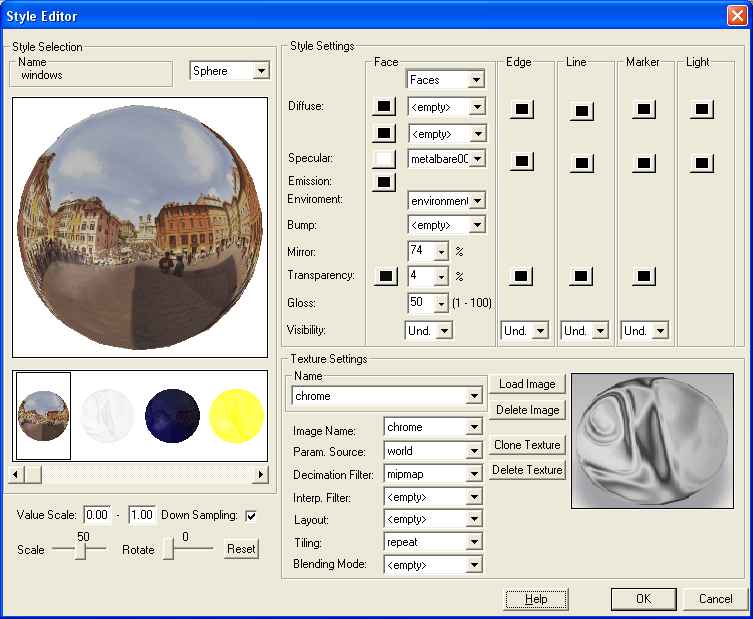
Style Selection
•Name: shows the name of the selected Style. The image that shows the selected style, can be in the shape of a Cube, a Plane, or a Sphere.
Style Settings
•Diffuse: is the color that an object reflects when illuminated by "good lighting," that is, by direct daylight or artificial light that makes the object easy to see. This is the basic color of the objects.
•Specular: is the color of highlights on a shiny surface. The highlights are reflections of the lights that illuminate the surface. For a naturalistic effect, set the specular color to the same color as the key light source, or make it a high-value, low-saturation version of the diffuse color. If you set the specular color to match the diffuse color, will give a matte effect, making the material appear less shiny. This is the color modulation applied to directly reflected lights.
•Emissions: controls the color of light that a part emits. This is the color supplied directly by the object.
•Environment: is used for setting up atmospheric and background effects. This is the environment map applied to the object.
•Bump: bump mapping makes an object appear to have a bumpy or irregular surface. When you render an object with a bump-mapped material, lighter (whiter) areas of the map appear to be raised, and darker (blacker) areas appear to be low. This is the bump map applied to the object.
•Mirror: quantifies the Environment applied, as a percentage.
•Transparency: controls how transparent the material is. This value is a percentage: at 100.0, the material is completely transparent; at lower values, the material is partly opaque; and at 0.0, the material is completely opaque.
•Gloss: (or dullness) depends on the size and intensity of its specular highlight. In the Material Editor, the Glossiness spinner affects the size of the specular area, and the specular Level spinner affects the intensity of the glossiness. When the specular Level is too high, and Glossiness is too low, you can get harsh backlights on your surfaces.
•Visibility: controls the display of hidden lines and markers. This is NOT to be confused with the choice of the hidden line algorithm itself. The default value is "visibility = on".
Texture Settings
Texture settings can be modified from set to set. The user can define the texture in one set, copy and modify it in another set. This way the user does not need to redefine the textures in each set.
•Image Name: allows the user to select a loaded image for which the settings will be modified/optimized.
•Param. (parameterization) Source
•cylinder map: automatically creates the texture map based on a cylindrical mapping.
•object: n/a
•physical reflection: an alternative setting for environment mapping. When set, this calculates the environment coordinates as a reflection between the normal (to the item being textured) and the view vector. The result is that the environment map is not held at a fixed position.
•reflection vector: this is the default setting for an environment map. It matches the behavior of OpenGL environment mapping, in that the environment is held at a fixed position along the view vector.
•sphere map: automatically creates the texture map based on a spherical mapping.
•surface normal: the surface normal computed for the local screen pixel.
•uv: used for traditional image based texture maps. The parameterization source comes from a user supplied (u,v) coordinate set.
•world: a three-valued parameter (XYZ) corresponding to the surface pixel's 3D world coordinate position.
•Decimation Filter
•mipmap: MIP maps (also mipmaps) are pre-calculated, optimized collections of bitmap images that accompany a main texture, intended to increase rendering speed and reduce artifacts.
•Interp. Filter
•bilinear: The texture data from the four closest texels to the texture coordinate are blended using a weighted average (bilinear interpolation).
Note: Texels are HOOPS image texture elements.
•stochastic: A faster form of interpolation that adds "noise" to the texture coordinates in order to simulate bilinear interpolation. The word stochastic means random, pertaining to chance.
•Layout
•rectilinear: normal texturing assumes "rectilinear", a simple 0->1 mapping in x & y.
•spherical: Environment mapping assumes "spherical", a sort of distorted polar coordinates, as defined by OpenGL for environment mapping.
•unknown: the default is "unknown", meaning that the code can assume the layout is whatever is appropriate for the usage.
•Tiling
•clamp: any "U,V,W" surface coordinate components outside the [0.0, 1.0] range are clamped to either 0.0 or 1.0, whichever is closer.
•mirror: similar to "repeat" (below), but every other modulo is inverted.
•repeat: a modulo operation is performed on any "U,V,W" surface coordinate components outside the legal range. This is useful when you want a pattern to repeat without visible "seams".
•Blending Mode
•modulate: this setting is only relevant for diffuse channels. When set, the texture will modulate, rather than replace, materials that came before it (for diffuse channel n, this would be first the underlying surface color then all diffuse channels i < n.
•decal: this setting is only relevant when the texture is applied to diffuse channel 0. When set, any transparent portions of the texture show the underlying diffuse color, rather than making the entire material transparent.
•decal + modulate: combination of the decal and modulate settings.
•Load Image: loads an existing image. The file types that can be loaded are: *.jpg, *.bmp, *.gif, *.png, *.tiff, and *.hsf.
•Delete Image: deletes an already loaded image.
•Clone Texture: creates a duplicate texture.
•Delete Texture: deletes the selected texture.
•Value Scale: = (scale_min, scale_max) Once the color intensities have been retrieved from the texture source, user may wish to rescale them in order to brighten or dim the overall texture. Incoming samples from the texture source are in the range 0.0 to 1.0. They are scaled to the range scale_min to scale_max.
•Down Sampling: Instructs HOOPS not to down-sample images that exceed 512x512 pixels, but instead to try and create a texture as close as possible to the original size of the image, without exceeding the texture size limit on the graphics card. For textures, many graphics cards have a limit of between 512x512 and 4096x4096 pixels. The default is "down-sampling".
•Scale: The Scale makes the image being applied to a surface either smaller or larger.
•Rotate: Rotates the image by a certain number of degrees.
•Reset: Applies to Scale and Rotate and resets them to their initial values: 50% and 0 degrees.
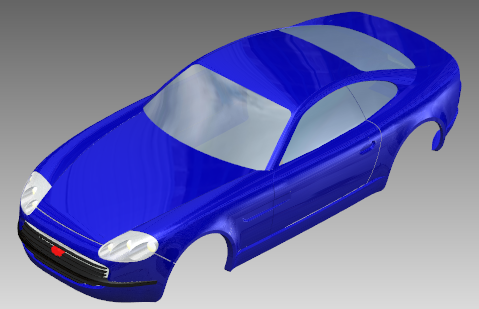
Examples of Styles Setup
•Style: Paint 
•Load images – select a landscape image from the following folder to be the styles environment: \visualization\images\landscapes
Also choose a metal image from \visualization\images\metal
Note: Do not change anything in the texture settings for either image
•Click the color square next to the diffuse section, and choose or create a color for your paint style.
•In the specular drop-down choose the metal file
•In the environment drop-down list select the newly loaded landscape image
•Change the Mirror setting from 100 to 15%
•Change the Gloss level from the default to 50
•Export your newly created style to build a style library for later use
•Style: Chrome 
•Load image – select the chrome image from the following folder: \visualization\images\metal\plate
Note: Do not change anything in the texture settings for the image
•Click the color square next to the diffuse section, and choose light grey
•In the specular drop-down choose the chrome image file
•In the environment drop-down list select the landscape image as in the Paint style above
•Change the Mirror setting from 100 to 75%
•Change the Gloss level from its default to 75
•Export your newly created style to build a style library for later use
•Style: Glass 
•Load images – select a landscape image from the following folder to be the styles environment: \visualization\images\landscapes (same image as the paint style)
Note: Do not change anything in the texture settings for the image
•Click the color square next to the diffuse section, and choose blue
•Click the color square next to the specular section, and choose white
•Click the color square next to the emission section, and choose white
•In the environment drop-down list also select the landscape image
•Change the Mirror setting from 100 to 35%
•Change the Transparency from 0 to 70%
•Change the Gloss level from the default to 70
•Export your newly created style to build a style library for later use
•Style: Plastic 
•Load images – select a plastic image from the following folder: \visualization\images\plastic
*Note* Do not change anything in the texture settings for the image
•Click the color square next to the diffuse section, and choose dark grey
•In the environment drop-down list select the newly loaded plastic image
•Change the Mirror setting from 100 to 15%
•Change the Gloss level from the default to 50
•Export your newly created style to build a style library for later use
•Style: Double-Layer 
•Load Images – select a desired base image from within the image library: \visualization\images\
•Also choose an image for the second layer; this image must have transparency so the base layer can still be seen, because of this the file type must be either .png, .giff, or .tiff. http://en.wikipedia.org/wiki/Transparent_pixels
•Click the first (top) Diffuse drop-down and select the image that is to be the base.
•Click the second (bottom) Diffuse drop-down and select the image with transparency.
•Adjust the texture setting for each of the loaded images until the style image reaches a desired appearance.
•If desired apply colors to the diffuse by clicking the color square next to the appropriate drop-down.

•Export your newly created style to build a style library for later use.
•Style: Bump Maps 
•Load Images – select a desired style for diffuse color drop-down from the image library: \visualization\images\
Also choose a bump file image for the 3D texture.
•In the Texture Settings change the Param. Source of the regular (non bump image) texture to physical reflection.
•Click the diffuse drop-down and select the regular texture image.
•Adjust the diffuse color to reach a desired look by clicking the color square next to the diffuse drop-down.
•Click the Bump drop-down and select the bump texture image.
•Export your newly created style to build a style library for later use.
Notes:
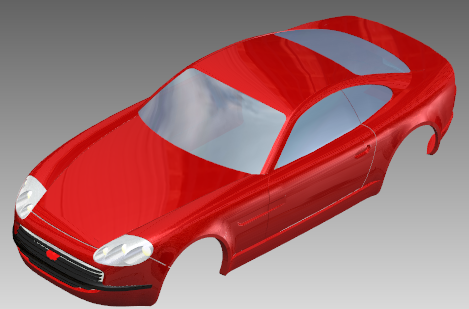
For a complete model that includes the above style see: \visualization\models\car.wtx
All images can be found on the DCS Gateway, on Visualization page.
Applying textured images
•Load Images - select a desired style for diffuse color drop-down from the image library: \visualization\images\
•Also choose a bump file image for the 3D texture If needed.
•In the Texture Settings change the Param. Source of the regular (non bump image) texture to UV.
•Click the diffuse drop-down and select the regular texture image.
•Adjust the diffuse color to reach a desired look by clicking the color square next to the diffuse drop-down.
•Click the Bump drop-down and select the bump texture image if needed.
•Using the scale slider scale the image to the correct size on your geometry.
•Export your newly created style to build a style library for later use.