The idea behind environment mapping is to render an object as if it were perfectly reflective, so the colors on its surface are those reflected to the eye from its surroundings. In other words, if you look at a perfectly polished, perfectly reflective silver object in a room, you see the walls, floor, and other objects in the room reflected off the silver object.
Using a 'cube map' the environment map will provide a very accurate visual result. To create a cube map six images will be applied to the cube map in the following sequence: positive Z-plane, negative Z-plane, negative X-plane, positive X-plane, positive Y-plane, and negative Y-plane. This cube map can then be used to create a skybox or be used as an environment map.
Description:
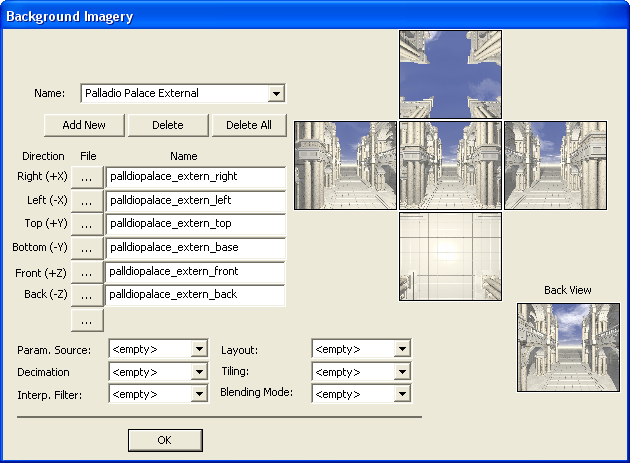
Go to View ![]() Environment or in the storage tree right-click the appropriate environment and select Edit Environment. This will open the Background Imagery dialog, which provides the user with the following options:
Environment or in the storage tree right-click the appropriate environment and select Edit Environment. This will open the Background Imagery dialog, which provides the user with the following options:


•Name (at the drop-down list): Allows the user to name the newly created Environment. The default name is Environment followed by the order number (e.g. Environment1).
•Add New: Will add a new Environment.
•Delete: Will delete the selected Environment.
•Delete All: Will delete all Environments.
•Direction: Below this entry are listed the planes in which the images will be applied
•File: The buttons ![]() listed under File, allow the user to load images for each Direction. The user has the option to select one file at a time, or all files together, using the bottom button
listed under File, allow the user to load images for each Direction. The user has the option to select one file at a time, or all files together, using the bottom button ![]() .
.
•Name (next to File): Lists all loaded images names.
•Param. (parameterization) Source
![]() cylinder map: automatically creates the texture map based on a cylindrical mapping.
cylinder map: automatically creates the texture map based on a cylindrical mapping.
![]() object: n/a
object: n/a
![]() physical reflection: an alternative setting for environment mapping. When set, this calculates the environment coordinates as a reflection between the normal (to the item being textured) and the view vector. The result is that the environment map is not held at a fixed position.
physical reflection: an alternative setting for environment mapping. When set, this calculates the environment coordinates as a reflection between the normal (to the item being textured) and the view vector. The result is that the environment map is not held at a fixed position.
![]() reflection vector: this is the default setting for an environment map. It matches the behavior of OpenGL environment mapping, in that the environment is held at a fixed position along the view vector.
reflection vector: this is the default setting for an environment map. It matches the behavior of OpenGL environment mapping, in that the environment is held at a fixed position along the view vector.
![]() sphere map: automatically creates the texture map based on a spherical mapping.
sphere map: automatically creates the texture map based on a spherical mapping.
![]() surface normal: the surface normal computed for the local screen pixel.
surface normal: the surface normal computed for the local screen pixel.
![]() uv: used for traditional image based texture maps. The parameterization source comes from a user supplied (u,v) coordinate set.
uv: used for traditional image based texture maps. The parameterization source comes from a user supplied (u,v) coordinate set.
![]() world: a three-valued parameter (XYZ) corresponding to the surface pixel's 3D world coordinate position.
world: a three-valued parameter (XYZ) corresponding to the surface pixel's 3D world coordinate position.
•Decimation (Filter)
![]() mipmap: MIP maps (also mipmaps) are pre-calculated, optimized collections of bitmap images that accompany a main texture, intended to increase rendering speed and reduce artifacts.
mipmap: MIP maps (also mipmaps) are pre-calculated, optimized collections of bitmap images that accompany a main texture, intended to increase rendering speed and reduce artifacts.
•Interp. Filter
![]() bilinear: The texture data from the four closest texels to the texture coordinate are blended using a weighted average (bilinear interpolation).
bilinear: The texture data from the four closest texels to the texture coordinate are blended using a weighted average (bilinear interpolation).
Note: Texels are HOOPS image texture elements.
![]() stochastic: A faster form of interpolation that adds "noise" to the texture coordinates in order to simulate bilinear interpolation. The word stochastic means random, pertaining to chance.
stochastic: A faster form of interpolation that adds "noise" to the texture coordinates in order to simulate bilinear interpolation. The word stochastic means random, pertaining to chance.
•Layout
![]() rectilinear: normal texturing assumes "rectilinear", a simple 0->1 mapping in x & y.
rectilinear: normal texturing assumes "rectilinear", a simple 0->1 mapping in x & y.
![]() spherical: Environment mapping assumes "spherical", a sort of distorted polar coordinates, as defined by OpenGL for environment mapping.
spherical: Environment mapping assumes "spherical", a sort of distorted polar coordinates, as defined by OpenGL for environment mapping.
![]() unknown: the default is "unknown", meaning that the code can assume the layout is whatever is appropriate for the usage.
unknown: the default is "unknown", meaning that the code can assume the layout is whatever is appropriate for the usage.
•Tiling
![]() clamp: any "U,V,W" surface coordinate components outside the [0.0, 1.0] range are clamped to either 0.0 or 1.0, whichever is closer.
clamp: any "U,V,W" surface coordinate components outside the [0.0, 1.0] range are clamped to either 0.0 or 1.0, whichever is closer.
![]() mirror: similar to "repeat" (below), but every other modulo is inverted.
mirror: similar to "repeat" (below), but every other modulo is inverted.
![]() repeat: a modulo operation is performed on any "U,V,W" surface coordinate components outside the legal range. This is useful when you want a pattern to repeat without visible "seams".
repeat: a modulo operation is performed on any "U,V,W" surface coordinate components outside the legal range. This is useful when you want a pattern to repeat without visible "seams".
•Blending Mode
![]() modulate: this setting is only relevant for diffuse channels. When set, the texture will modulate, rather than replace, materials that came before it (for diffuse channel n, this would be first the underlying surface color then all diffuse channels i < n.
modulate: this setting is only relevant for diffuse channels. When set, the texture will modulate, rather than replace, materials that came before it (for diffuse channel n, this would be first the underlying surface color then all diffuse channels i < n.
![]() decal: this setting is only relevant when the texture is applied to diffuse channel 0. When set, any transparent portions of the texture show the underlying diffuse color, rather than making the entire material transparent.
decal: this setting is only relevant when the texture is applied to diffuse channel 0. When set, any transparent portions of the texture show the underlying diffuse color, rather than making the entire material transparent.
![]() decal + modulate: combination of the decal and modulate settings.
decal + modulate: combination of the decal and modulate settings.
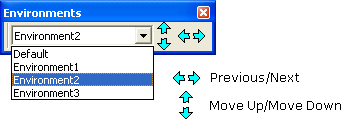
The Environments toolbar will list all existing environments, allowing the user to:
•Reorder the environments using the Move Up and Move Down arrows.
•Replace the displayed environment using Previous and Next arrows.

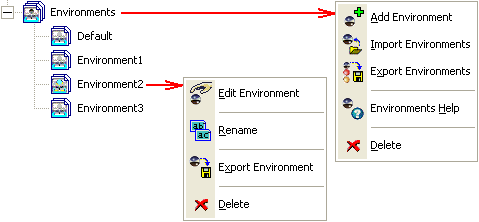
The Environments are also displayed in the Navigation window, under the Visualization.

•Environments (parent)
![]()
![]() Add Environment: Creates a new environment.
Add Environment: Creates a new environment.
![]()
![]() Import Environments: Allows importing available environments.
Import Environments: Allows importing available environments.
![]()
![]() Export Environments: Allows exporting all environments, so they can then be imported into other models.
Export Environments: Allows exporting all environments, so they can then be imported into other models.
![]()
![]() Environments Help: This option opens the Help Manual at the Environments page.
Environments Help: This option opens the Help Manual at the Environments page.
![]()
![]() Delete: Removes all environments.
Delete: Removes all environments.
•Environment (individual)
![]()
![]() Edit Environment: This option will open the Background Imagery dialog, as shown above, allowing the user to modify an existing, or fill in the information for a new environment.
Edit Environment: This option will open the Background Imagery dialog, as shown above, allowing the user to modify an existing, or fill in the information for a new environment.
![]()
![]() Rename: Renames the selected environment.
Rename: Renames the selected environment.
![]()
![]() Export Environment: Allows exporting selected environment, so later can be imported into other models.
Export Environment: Allows exporting selected environment, so later can be imported into other models.
![]()
![]() Delete: Removes selected environment.
Delete: Removes selected environment.