XX. Contact on the two flanges at corners (Contact_Upr_to_Base__1-4)
Purpose and usage:
•Removes interference between two parts at the specified points.
•Applied on constrained flexible/flexible and rigid/flexible part combinations. It will deform the flexible part(s) until the nominal gap measured in target point associated vector direction, is zero or positive for all pairs of points.
Things to know:
=> Any moves that follow the Compliant Contact Move will reposition the parts accordingly, along with the points included in the Compliant Contact Move. This routine does not maintain the point's position if it is followed by other routines.
=> The contact routine can iterate up to 100 times during the gaps calculation. If it cannot clear all interferences it will report the number and amount of interferences and use the last position for the parts.
=> The contact interference between two points of the Contact move (object/target pair) is measured in target point direction. This means a positive distance of the object point to the target point is a gap (=nothing happens) and a negative distance is an interference (=contact force will be applied).
=> If all pairs of points show positive gaps initially, the Contact move will not deform the parts during the building process (there is no interference between the parts).
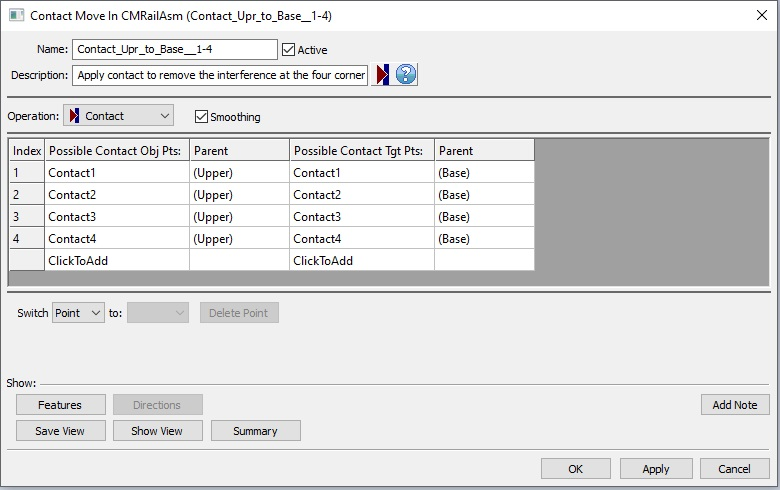
20.1 Apply Contact move at the four corners between the two sets of flanges to remove interference.
20.1.1 Select the![]() Contact icon and choose the CMRailAsm product as parent part.
Contact icon and choose the CMRailAsm product as parent part.
20.1.2 Name the move "Contact_Upr_to_Base__1-4".
20.1.3 Click on the [ClickToAdd] button in the Possible Contact Obj Pts section and select points Contact1, Contact2, Contact3 and Contact4 on the Upper part in the Navigation Tree or from the Graph window.
20.1.4 Click on the [ClickToAdd] button in the Possible Contact Tgt Pts section and select points Contact1, Contact2, Contact3 and Contact4 on the Base part in the Navigation Tree or from the Graph window.
20.1.5 Select smoothing check box to use Smoothing.
The completed dialog box should appear as below:

20.1.6 Save the model.
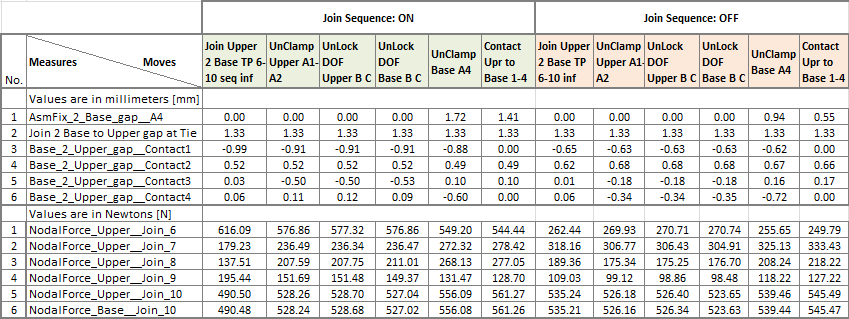
Results:
The nominal values of the measurements after applying Contact move at the corners will change.

>>>Your results may not match the above illustration<<<