|
 The Assembly Design workbench allows the user to control files being added into or deleted from the Assembly. The Assembly are usually created from Physical Products or importing a CATIA V5 CATProduct file.
Importing Parts or Sub-assemblies
Open or create a sub-assembly in 3DEXPERIENCE. If the user needs to add new files or existing files to the assembly, the user can select on an Assembly and Insert new, or Insert existing files from the 3DEXPERIENCE PLM system.
1. Make sure to launch the Assembly Design app from the Compass at the top right. Select or Highlight the left quadrant and locate the Assembly Design app.
2. Once the Assembly Design has been switched to active, the user will either will either see a new product tree, or the Product tree will show the whole assembly with new functions.
oAlternatively, the user can double-click the top assembly level and 3DEXPERIENCE will switch to Assembly Design.
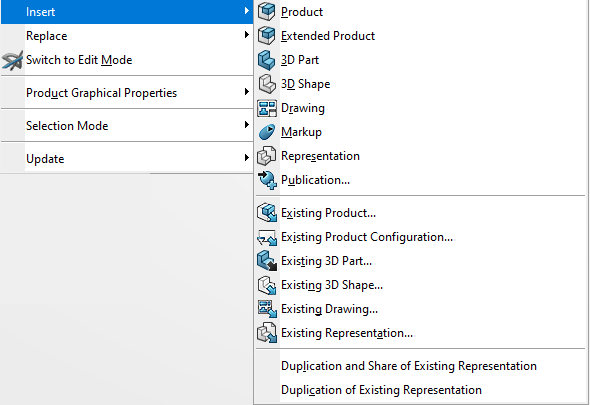
3. Right-click on the top Assembly Level and highlight Insert.
When working in 3DEXPERIENCE and 3DCS, users may want to adjust the color or the transparency of the part. In 3DEXPERIENCE, you will have to change the parameters and tell it to keep the modifications.
1.If you're in 3DCS, double-click on the top level assembly, 2.Right-click on the top level assembly, 3.Highlight on the Product Graphical Properties line 4.Select Keep Modifications, 5.Select Save or Save with Options to save it to the assembly |
|
