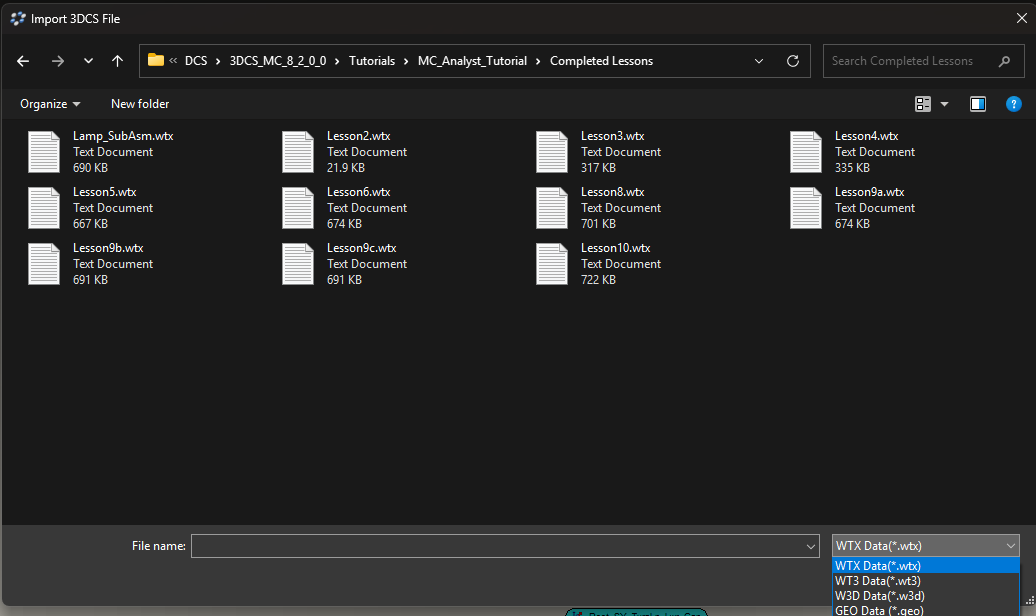
Users can import
WT3 Data: This is a 3DCS file which has been saved in text file format instead of binary format. The .wt3 file would be used to import a file that was viewed and modified in Microsoft Notepad or a different program.
W3D Data: A .w3d file is the standard binary file format for the MS Windows format of 3DCS. Importing a 3DCS file loads a 3DCS file into an already loaded model in the 3DCS program. It is used when smaller assemblies created separately are to be added to an existing assembly.GEO Data: A GEO Data file is used for importing data about individual parts within 3DCS. A "*.geo" file contains parametric information about a node in an assembly. This file does not contain any information about the moves, measures or tolerances from that part. This file also does not contain the sub tree information. If a parent node in an assembly is exported as a GEO, the geometric information about only that part will be exported, not information about its children. Also, the part file name needs to have the same name as the destination part in the Tree window, to replace the point information. If the part filename is not the same, it will add the part to the end of the tree.
|

How to import 3DCS files (WTX, W3D, WT3, GEO):
•Create a new 3DCS model or open a previously saved model (WTX) file.
•Click on File ![]() Import.
Import.
•Select the file type you wish to Import into your current open model file.
•Select the directory in which the file is located.
•Select the desired file to be imported.
•Click the Open button to import the file or Cancel to quit the function.
•The imported file tree will be appended to the root if a matching top level part (root) name cannot be found.
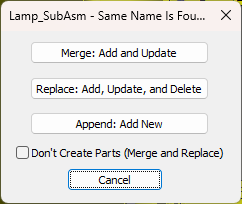
•Else the following dialog box will be displayed.

If you import a WTX, WT3, or a GEO file, 3DCS will ask where and how to import the data.
Select one of the three options: Merge, Replace or Append.
•Merge - Add and Update: Existing MTM's, GD&T, circles, slots, points and mesh will be updated with content of wt3 file and new MTM's, GD&T, circles, slots, points and mesh will be added.
•Replace - Add, Update and Delete: Replaces all of the WTX data: MTM's, GD&T, circles, slots, points and features. with the existing MTM's, GD&T, circles, slots, points and features. Anything that wasn't in the WTX file will be deleted.
•Append: Creates a new sub-assembly or new parts, with the 3DCS data.
These Functions will create missing assemblies/Parts in the correct location.
If the imported .wtx file have part name not matching with the part name in the current tree then Tree Linking Wizard dialog will pop up allowing the user to manually link them which avoids duplicating parts in the tree.