VII. Add Force Measurements
Purpose and usage:
•A clamp, join, concentrated force, gravity, temperature, or other type of stress applied to a node will result into a nodal force. The nodal force is equal and opposite to the actual applied load on each node.
•It's the resulting load at constrained or deformed nodes.
•The part must be over constrained, to generate these forces.
7.1 The following force measurements will be added to the model:
1. NodalForce_Upper__Join_6 - Nodal force on Upper at Join_6
2. NodalForce_Upper__Join_7 - Nodal force on Upper at Join_7
3. NodalForce_Upper__Join_8 - Nodal force on Upper at Join_8
4. NodalForce_Upper__Join_9 - Nodal force on Upper at Join_9
5. NodalForce_Upper__Join_10 - Nodal force on Upper at Join_10
6. NodalForce_Base__Join_10 - Nodal force on Base at Join_10
These forces will be measured at every step during the assembly process.
7.1.1 Select ![]() Force Measure icon and choose the CMRailAsm product as parent part.
Force Measure icon and choose the CMRailAsm product as parent part.
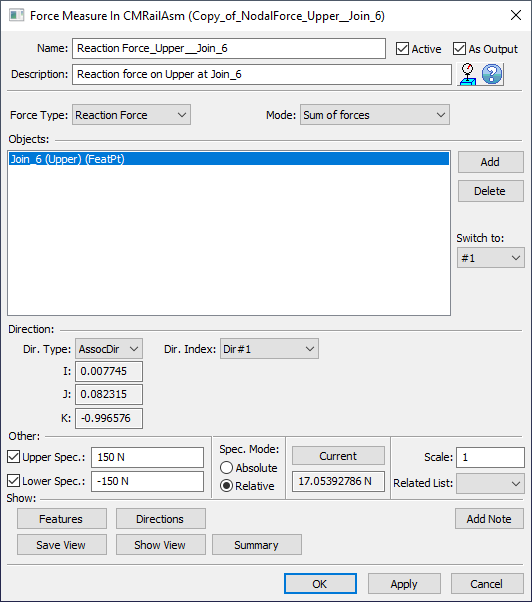
7.1.2 Name the measure "NodalForce_Upper__Join_6" with a description of "Nodal force on Upper at Join_6"
7.1.3 Click on the [Add] button next to the Objects section and select point Join_6 on the Upper part from the Navigation Tree or from the Graph window.
7.1.4 Use the Mode selection as Max magnitude force.
7.1.5 This type of measurement has no direction, it only measures the total force value (magnitude).
The completed dialog box should appear as below:

7.1.6 Click [OK] to close the Force Measure dialog box.
7.1.7 Save the model.
Results:
The nominal values of the measurements remain unchanged.