Assemblies created in 3DEXPERIENCE can show a section of the part, using the 3DEXPERIENCE sectioning tools.

(Taken from 3DEXPEREINCE 2018x)
Accessing Visualization Sectioning tool:
1.Switch the app to Assembly Design.
2.In the Scene tab, select the View tab.
3.Expand the menu to show the right menu.
4.Select Visualization Sectioning tool.
(Taken from 3DEXPEREINCE 2018x)
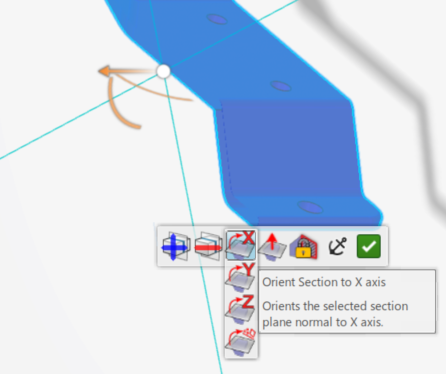
Using the Sectioning tool:
1.Once the Sectioning tool is active, the Sectioning menu is available on screen.
2.Drag the Robot by Sliding along the axis, or rotating around the axis point on the part.
3.Users can change the axis direction, based on the part. Switch to X, Y or Z axis.
a.Optionally, users can also pick an edge or face as a direction, by picking the last option called Position Section on Selected Geometry.
4.Select the green check to save the section.
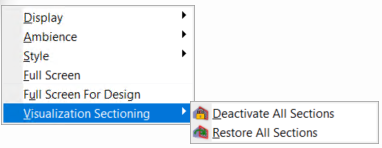
Activating/Deactivating Sections:
1.If a section has been created, Right-click in graphic space and highlight Visualization Sectioning.
oSelect Restore Sections to edit or display the section.
oSelect Deactivate All Sections to hide the section cut.
oSelect Activate All Sections to show all sections.
(Taken from 3DEXPEREINCE 2018x)