In CATIA V5, it is sometimes necessary to repair damaged files. Doing so can dramatically improve the stability of CATIA V5 and 3DCS, while failure to do so can be catastrophic - file issues may remain hidden until it is too late to avoid data loss. This guide outlines a process to prevent this and often repair existing issues, using the "CATIA Data Upward Assistant for V5" (CATDUAV5), provided by Dassault Systemes.
When do I need to run CATDUAV5?
Ideally, CATDUAV5 should be run before starting work on a new 3DCS model. However, even on previously "Cleaned" files, new issues may arise. In such cases CATDUAV5 should be run as soon as possible - as outlined in this article. As a precaution, a full backup of the files to a new directory should be performed. For an existing 3DCS model, pre and post checks of model results may also be performed for verification (see "Appendix C").
For a list of issues repaired by CATDUAV5, see "Appendix B". Please also see the CATIA online help for information about error codes returned by DUA. This can be found by searching for "CATDUA", and is very helpful in understanding the output logs generated by this process.
I. Preparing To Run CATDUAV5
Before running CATDUAV5 the following steps should be taken:
•View the assembly in CATIA. Know what the parts look like before processing. After processing, any problem with the Cleaned parts may be visible at a glance.
•Copy all files to a new directory using Save Management and Propagate Directory. Always check that ALL FILES are being copied to the new location.
Note: When propagating to a new directory, ALWAYS expand the "Location" column and verify that the entire path is correct. If not – you could be overwriting your original files every time you save!
•Compare the number of files and directory size between both directories. If the numbers don't match - make sure you have all the files you need.
•In CATIA, Close the files to be processed by CATDUAV5. Ideally, CATIA should be open, with no files loaded.
II. Setting Options
•In CATIA, Go to Tools Þ Utility. There will be a short delay, and a dialog box will appear. Double-click "CATDUAV5".
•A new dialog will appear (see right) with many options which are explained below.
•Output Directory - location where the Cleaned files will be saved, and also "Clean" and "Check" output logs. If files will be Cleaned, set this to the same location files are currently located (after copying to the new directory), and check "replace".
•Process pointed documents - all CATParts and CATProducts under a top level product will be selected automatically. By selecting only one CATProduct, the entire model can be selected.
•Replace - if Output Directory is set to one already containing files, replace old files with new. This should be used when Cleaning files using output to same directory.
•Check/Clean - "Check" parts for problems (doesn't modify the files, generates log files) or "Clean" files, which corrects errors wherever possible. Logs all changes made, in log files in output directory.
•Select - select files to be processed. Check "Process pointed documents" first, if necessary.
•Remove - remove selected files from list, so they will not be processed.
•Save - save all parameters to an XML file, so the job can be run later.
•Run - start the process. A command window will appear, and will remain until the process is complete. This process can be time consuming depending on the number of files and complexity of the repairs. When complete, the CATDUAV5 dialog box will remain on screen, and the command window will disappear.
Note: When SELECTING files using "Process pointed documents": Take care that only files that should be processed are listed. Often, old links in a CATProduct will be followed, causing changes to files in other locations. If this occurs, remove unwanted files from the list before starting the process. Re-run CATDUAV5 after and unwanted files should not be listed, as the CATProducts will no longer contain old links
III. Running CATDUAV5
At this point, all files should be backed up to a new directory which will eventually contain the repaired files, as well as the output logs. Options should also be set - generally these options will be: replace (checked), process pointed documents (checked), Output Directory (same as files to be processed), and either Check or Clean will be selected.
It is recommended to run Clean first, then run Check. Compare logs to verify that all problems are fixed. Occasionally the final Check will uncover new errors. In rare cases, the repair itself may cause a new issue, although this is extremely unusual and should be minor. Regardless, a final Clean should finish the job, and a Check will verify it. If the second Check doesn't return error free, the problem may not be fixable using CATDUAV5.
Note: When running a Clean or Check multiple times, the log files should be copied to another directory before each new run. If not, THEY WILL BE OVERWRITTEN, making changes to files impossible to track down later. This is particularly important when fixing badly corrupted models.
Appendix A: CATDUAV5 Quick Reference Guide
Checking/Cleaning files in CATDUAV5
1.Copy all files to a new directory, using "Save Management" and "Propagate Directory".
CAUTION: When propagating to new directory, verify that EVERY FILE is targeted to the new directory, and indicates "SAVE" as the action to be performed. If any files are not carried automatically to the new location, use "save as" and target those files manually (see Appendix B, item # 1)
2. Close top product, so none of the files to be processed are open in CATIA. CATIA should still be open (if necessary, re-open CATIA).
3. Go to Tools Þ Utilities and in the pop-up window, double-click "CATDUAV5".
4. "Select Output Directory" to match location of files to be processed.
5. Select/check "replace" and "Process pointed documents".
Note: selecting "Process pointed documents" will select all documents attached to a Product.
6. Choose either "Check" or "Clean".
Note: running Clean first is advisable, followed by a verification Check. The "Clean" log will show all fixes performed, and the "Check" log should show no remaining errors (0 for all errors).
7. Click "Select" button and choose the top CATProduct to be processed.
8. Verify that only those files desired are selected.
CAUTION: Certain CATProduct file corruptions will result in files outside the current directory being selected, and generally these should be removed from the list. See Appendix B for more info.
9. Click "run" to process files.
10. Remove all files from list by selecting and clicking the "remove" button. Select the top product again to verify that only desired files are now listed. If not, return to step #7 and Clean again. Backup log files first if necessary.
11. Review output logs from CATDUAV5 to verify that all issues are corrected. There will be an html file in the output directory titled "OutputCATDUA.htm" which summarizes all results.
12. When completed, the top product in the output directory should be propagated to a new location. Verify that all files have been moved to the new directory, and continue working with the files as usual.
Appendix B: Specific Issues Fixed By CATDUAV5
1. When propagating a model to a new directory, all linked parts do not propagate automatically, and may not show "save" under action to be performed.
2. When saving a model, some parts do not save changes. When the model is later re-opened, changes made are missing.
3. User receives errors when opening a model, indicating that files can not be found, but the files should not be in the model in the first place (stale links, not removed properly by CATIA).
4. Model from 4.14.0 can not be opened in 4.14.1 of 3DCS (this is actually a CATIA issue - fixed by CATDUAV5). In this case, CATIA crashes during initial loading of the parts.
The following items are overall performance and stability issues addressed by CATDUAV5
5. CATIA crashes frequently, sometimes without warning. This will often occur when the user interacts with corrupted geometry.
6. Model takes much longer to open or save than it should.
The following items appear to be fixed by CATDUAV5, but are still awaiting verification
7. Points shift from one instance of a CATPart to another within CATIA. 3DCS still correctly tracks which part the points are on, but the position in space is translated to a different instance of the part. This is usually first seen as a 3DCS error when nominal building the model - "move can not be resolved". Validate Model does not detect this issue.
8. Feature references in 3DCS Tolerances and Moves shift to other instances of a CATPart, (see previous item).
Appendix C: Verifying Model Before and After Running CATDUAV5
This process assumes a reasonably mature model exists, including a significant number of measures. If this is not the case, use Measurement Generator to create measurements on as many parts as possible before proceeding. Placing a common prefix on these measure names such as "test_" will assist in removing them later, when verification is complete.
Note: Measurement order and names in the output CSV file must be identical before and after CATDUAV5 processing for this verification to work. Do not change any moves, move order, names, or turn any moves on or off between "before" and "after" SIM runs.
1. Before starting the CATDUAV5 procedure, run 2000 simulations* of the model, saving SIM output as CSV to a safe location, where it will not be deleted or over-written.
2. Proceed with CATDUAV5 processing per this guide.
3. Upon completion of final checks, run simulations again.
4. Output SIM to CSV file, saving to a different filename.
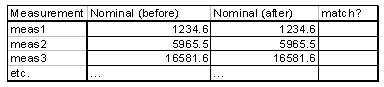
5. Open both CSV files in Excel, placing "Measurement Name", "Nominal" columns side by side on a sheet. The Measurement name columns must match between both SIM runs.
6. Compare Nominal columns from both sets of simulations. These numbers should be identical, unless parts have physically moved in the model.
Using an Excel formula the results can be compared quickly, as below:
Below is the Excel formula used (see fourth column):
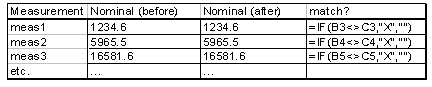
7. After creating the formula, change one of the numbers briefly to verify that the formula works (this is ALWAYS advisable when working in Excel):

8. Click Edit/Undo to undo the change, now compare the "match?" column. If no "X" appears in the column, then the model is verified.
9. For additional verification other columns can be compared in the same way. Assuming a reasonable (and equal) number of simulations were run before and after CATDUAV5 processing, with the same seed value, the "Est. Range" column can be compared for a final check.
Note: If only "Nominal" is being compared, only 1 simulation needs to be run.