The purpose of the
|
Inputs
Select the Unclamp icon ![]() to get the Unclamp Move dialog box:
to get the Unclamp Move dialog box:
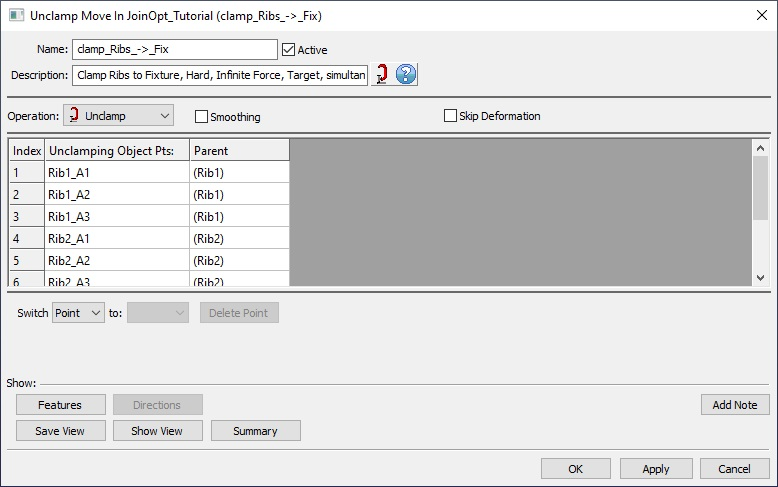
•Name: The move name must be unique to the model.
•Description: This is an optional explanation of what the move does.
•Help: The Help button is context sensitive; it will open the Help Manual at required topic page.
•Operation: Allows the user to select the appropriate operation for the move. The drop-down list lists: Clamp, UnClamp, Join, LockDOF, UnLockDOF, Contact, Un-contact and DefoMorphing.
•Activate Smoothing to deform the entire part.
•Unclamping Object Pts: These are the object points that will be unclamped from the target. The number of points can be from 1 to n.
•Skip Deformation: Selecting this option will unclamp all the points in the move without deforming the part. This option should be used when unclamping the last clamps in order to transfer the part/assembly to a new fixture/assembly. We introduced this option for multiple stage assemblies. The part/assembly will relax relative to the remaining clamped points and then keep this shape until it is clamped in the next stage. This process provides consistency by following the assembly process and eliminating unnecessary deformation during transfer between fixtures. This is the process we recommend for multi-stage assemblies. This option will UnClamp the points however still keeping the deformed position of part because internally the part is still fixed at those points. Any compliant move following this UnClamp move will overwrite these fixed points. Thus, this option should be used as the last step in the sub-assembly level before you move to next fixture. A warning message will let the user know if the part is not completely unconstrained after this move.
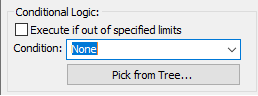
•Options:
1.When a measure is added in the Options as a Condition will trigger the move when the selected measure is within the specified limits.
2.When a measure is added in the Options as a Condition and the "Execute if out of specified limits" is checked will trigger the move when the selected measure is outside the specified limits.
•Click To Add: Allows the user to add more points to be unclamped.
•Switch To: will reorder the unclamp points.
Outputs
•The result of this routine will be the deformed object part (previously clamped pairs are unclamped)
•Deformation propagates to other feature points on the object component as well as other parts previously welded to the object parts.
Process
•Select the Unclamp icon ![]() and choose the location for the Unclamp Move. This move must be at a product level, at least one level above the part, after the Load FEA move and after the previously created clamp move.
and choose the location for the Unclamp Move. This move must be at a product level, at least one level above the part, after the Load FEA move and after the previously created clamp move.
•Add or Remove object/target points using the Click To Add option.
•Use the Show: Features button to display the points on the screen to verify the object points correspond with their respective target points.
Note:
•When unclamping (without Skip Deformation option selected) you must leave clamped a number of points that will ensure that the part is not underconstrained. This number can vary based on the combination between the type of stiffness file and the type of constraints used in the clamp move. These points are required for location and are needed to ensure proper springback. These points can be any of the original clamped points.