The purpose of
|
Procedure
•Open StiffGen, add the part, select appropriate FEA Tool and check the Mass Matrix box to generate the Mass Matrix file. Close StiffGen.
•Open the Load FEA Data move and load the mass matrix for the compliant parts, along with the mesh and stiffness matrix.
•Select the ![]() Compliant Gravity Move and select the assembly to create the move in. This move must be at a product level, at least one level above the part, after the Initialization move.
Compliant Gravity Move and select the assembly to create the move in. This move must be at a product level, at least one level above the part, after the Initialization move.
•Add parts using the [+] in the Parts Subject to Gravity field.
•Set the direction vector.
•Click OK to save and close the dialog.
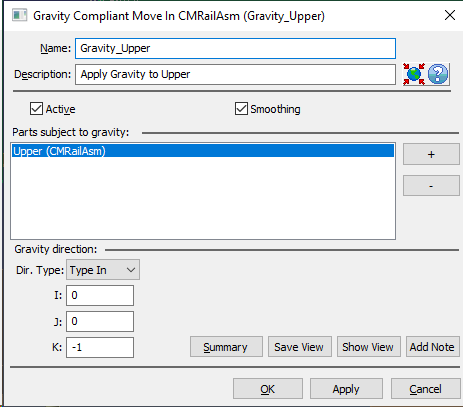
•Name: The move name must be unique to the model. •Description: This is an optional explanation of what the move does. •Help: The Help button is context sensitive; it will open the Help Manual at required topic page. •Activate Smoothing to deform the entire part. •Parts Subject to Gravity: The 'plus' button allows adding the part(s) to which the gravity effect will be applied. They can be removed using the 'minus' button. •Gravity Direction: Specify a direction in which the gravity will be applied. The Type-In is the only option available and is defaulted to (0,0,1) as specified in Preferences. If gravity needs to be applied in a different direction, the new values can be typed in. The Gravity Compliant move vectors are with respect to the global coordinates. •Summary: Shows move information in Notepad.
|
|---|
•The result of this routine will be the deformed object part due to gravity •This is a permanent deformation which propagates to other feature points on the object part.
|
|---|
Notes:•Nominal Build must be performed before the this move is executed. •Part must be fully constrained before applying gravity.
|